Friday, June 8, 2018

Carl Zeiss Jena Pancolar 50mm f/1.8 MC lens sample photos without pp.

Carl Zeiss Jena Pancolar 50mm f/1.8 MC lens technical details:

type: Prime lens
mount type: M42
optical design: 6 elements in 5 group
aperture range: f/1.8~f/22
aperture blade: 6
minimum focus: 35 cm
filter thread size: 49mm
weight: 250g
length: 43mm

I don't much care about this technical details of lens. But sometimes it can be useful.
For example, if I already have 49mm uv filter or hood, I can use with this lens.
And I'm walking long hours when I do photo-walks. So if lens wasn't heavy, it was very suitable for me. That is the reason that I mostly shoot with prime lens.
So I do check those things from the technical details.


You can read more about the lens from here:


Photos of the lens that I used.

Carl Zeiss Jena Pancolar 50mm f/1.8 red MC lens

Carl Zeiss Jena Pancolar 50mm f/1.8 red MC lens


Technical notes:

These photos were all taken with handheld and I used M42 lens to Sony E mount or Micro four thirds adapter so I have no idea about aperture number for the photo.

When I am taking photos, I do use Raw file format. So I need to convert raw file to jpg file and during that time, I do some post-processing--this is kind of darkroom process in developing film.
And when I do this, I don't use any default setting from Rawtherapee--open source software because there has some image modification settings like sharpening, micro-contrast and among other things.
I don't use Adobe Photoshop but this also has same kind of default setting with sharpening.
This isn't important for photography. But this is about the lens--what kind of photo I can take with this lens. So sharpening won't help to know about the lens.

So when I do use Rawtherapee, I removed all the default setting.
I will do these adjustments, if necessary:
 - click the auto button in exposure tab--automatically calculate the exposure value,
 - adjust exposure value, if overall image was still dark or too bright,
 - adjust contrast(between 3 and 18) in L*a*b* adjustments tab,
 - if there have some areas were too dark or too bright which makes me feel unbalance the overall look, adjust the shadow/highlight value.
 - Sometimes, white balance set to auto or slightly reduce the temperature value. Because Sony A7's white balance value was quite terrible when I do use other brand lens--not Sony E mount lens.


Sample photos:

Sony A7 with Pancolar 50mm f/1.8:

Cherry blossom at Hanja, Cheongdo

Bokeh(?) shot
* It was not properly focused and some parts were overexposured--this is really small flower so little breeze make photo shake. I did include it for the bokeh--out of focus area.


at the Sincheongyo - Korean word gyo means bridge
When I used Rawtherapee with this photo's raw file, it came out too dark. So I did use Sony's Imaging Edge software and change the only white balance to auto. And then rotate a bit and adjust levels with Gimp--open source software.


Self-portrait through mirror
I should cut some useless and distracting part--left and right side. But this is more about finding out lens capabilities. So I will just leave it that.
I did use Sony's Imaging Edge software--increase exposure value to 0.33 ev(1 stop or 1 click) and then creative style to portrait.


Rapeseed


Olympus E-P3 with Pancolar 50mm f/1.8 - Olympus E-P3 has crop factor of x2 so lens became 100mm lens--so it's more like a medium telephoto lens.
Only one time I did take photo with Olympus E-P3 because I didn't expect this lens as medium telephoto lens. And I couldn't familiarise with colour that produce.

But this bokeh was interesting so I included it here.

Bokeh shot(?)
at the Sincheongyo
This photo was taken at same place as above--with Sony A7. So you can see how much it cropped.

When I took those photos, I took the shot in jpg, not raw file. And I did use Olympus Viewer software with Auto Tone Correction function--not any other modification.


P.S. If you'd like to read in Korean, you can read it from here--this is my Korean blog.

Wednesday, June 6, 2018

Nikon 24mm f/2.8 AI-S Nikkor lens sample photos.

Nikon Nikkor 24mm f/2.8 Ai-s lens technical details:

format: 35mm SLR
type: Prime lens

mount type: Nikon F mount
optical design: 9 elements in 9 group
aperture range: f/2.8~f/22
aperture blade: 7
minimum focus: 30 cm
filter thread size: 52mm
weight: 275g
length: 45.7mm

I don't much care about this technical details of lens. But sometimes it can be useful.
For example, if I already have 52mm uv filter or hood, I can use with this lens.
And I'm walking long hours when I do photo-walks. So if lens wasn't heavy, it was very suitable for me. That is the reason that I mostly shoot with prime lens.
So I do check those things from the technical details.


You can read more about the lens from here:


About the lens evaluation:

I'm not that much good at judging about the lens. But I read quite a lot about the lens from the web.
And quite number of times, I'm finding very strange remark--like this one.

I can't say I really like what Nikon 24mm f2.8 ais produce. And I probably can say I really don't like the corner or edge area--but not all the photos I took. So sometimes or many times, it was quite okay with those corner or edge area.
So if some people saying Nikon 24mm f2.8 ais was bad--because she or he doesn't like what Nikon 24mm f2.8 produce, I probably can agree.

But problem is when some people trying to prove Nikon 24mm f2.8 ais lens were terrible lens--with compare the extremely expensive--excellent lens.
Some people compare this lens with Nikon 24-70mm f/2.8 lens--I don't know much about zoom lens but I think this is one of best zoom lens that Nikon produced, or with Nikon 18-35mm f/3.5-4.5G lens.
Nikon 24-70mm f2.8 costs about $1,800. And Nikon 18-35mm costs about $750.

Nikon 24mm f2.8 ais is old lens so compare with market price wasn't fair. But newer version of this lens is Nikon 24mm f2.4d so it costs $339. You can probably buy Nikon 24mm f2.8 ais lens for about $120 to $200.
Many people were trying to compare with these huge different price tag--$1,800 lens to compare with far less than $339 lens.
Does it make sense to you?

At least, they don't try to compare with Nikon 14-24mm f2.8 lens which quite number of people refer to one of best wide angle zoom lens--not only Nikon lens, among other brand lens like Canon.


This lens can't be really good like Nikon 50mm f/1.8 lens or probably like Nikon 28mm f/2.8 Ai-S lens. But I don't think it is worse than 20mm f/2.8d lens--that also quite hard to judge because 20mm was wider than 24mm lens so corner wasn't worse than 24mm.

Nikon 24mm f/2.8 ais probably wasn't great lens like Nikon 50mm f/1.8 or Nikon 28mm f/2.8 Ai-S(minimum focus to 0.2 meter version). But I think it is quite good lens or at least, it's okay lens--not everyone, of course. And many people include me was slightly disappointed with corner--quite soft.
So if you use with crop body, I think you probably won't disappoint--people have different taste of things so some people might disappoint though.


Photos of the lens that I used.
Nikon Nikkor 24mm f/2.8 Ai-s lens

Nikon Nikkor 24mm f/2.8 Ai-s lens


Technical notes:

These photos were all taken with handheld and I used Nikon lens to Sony E mount or Micro four thirds adapter so I have no idea about aperture number for the photo. Some photos were taken with Nikon D7000 which can recorded aperture number.

When I am taking photos, I do use Raw file format. So I need to convert Raw file to jpg file and during that time, I do some post-processing--this is kind of darkroom process in developing film.
And when I do this, I don't use any default setting from Rawtherapee because there has some image modification settings like sharpening, micro-contrast and among other things.
I don't use Adobe Photoshop but this also has same kind of default setting with sharpening.
This isn't important for photography. But this is about the lens--what kind of photo I can take with this lens. So sharpening won't help to know about the lens.

So when I do use Rawtherapee, I removed all the default setting.
I will do these adajustments, if necessary:
 - click the auto button in exposure tab--automatically calculate the exposure value,
 - adjust exposure value, if overall image was still dark or too bright,
 - adjust contrast(between 3 and 18) in L*a*b* adjustments tab,
 - if there have some areas were too dark or too bright which makes me feel unbalance the overall look, adjust the shadow/highlight value.
 - Sometimes, white balance set to auto. Because Sony A7's white balance value was quite terrible when I do use other brand lens--not Sony E mount lens.


Sample photos:

Nikon D7000 with Nikon 24mm f2.8 lens - Nikon D7000 has crop factor of x1.5 so this lens became 36mm lens.

at the Dongdaemun design plaza, Seoul

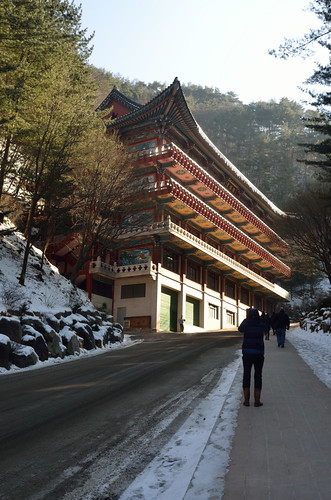
at the Guinsa Buddhist temple, Danyang
I was trying to focus center part but it came out like that. But you can see how out of focus part looks like--Nikon D7000 has crop factor of x1.5 so Nikon 24mm became 36mm.
With crop body, it is still useful for close up--or macro shot.

Winter in Guinsa - Korean 'sa' means Buddhist temple.
Winter in Guinsa - Korean 'sa' means Buddhist temple. - from my flickr account.


at the Sincheongyo, Daegu
As you can see from the photo, it was mixture of quite bad pollution, smog and not very bright winter sun light.


Olympus E-P3 with Nikon 24mm f2.8 lens - Olympus E-P3 has crop factor of x2 so this is lens became 48mm lens--not wide at all.

at Sincheongyo, Daegu

at Hanja, Cheongdo
P.S. I forgot to mention that this photo was post-processed with Olympus Viewer 3 program. Because I felt that it has some noise--ISO 200 so I didn't use Rawtherapee.


This photo was cropped out from previous photo. I did use auto-white balance function in Gimp--open source software. For making clear the leaves and water droplets.


Sony A7 with Nikon 24mm f2.8 lens:

at Sincheongyo, Daegu

near Chilseongsijang, Daegu
This is handheld-HDR shot which automatically generate from Sony A7--HDR paiting in Picture effect menu. And it took three shots to make one HDR photo.
That is the reason why you can see left side of photos with ghost--halo of cars.
I did include this photo because this photo shows Nikon 24mm f2.8's capability--Sony A7 wasn't crop body like above's.


Three photos were taken at same spot--Sincheongyo. Olympus E-P3's was slight different angle though.
So you can compare the full frame camera with crop body camera--crop factor of x1.5 and x2.


with tilt adapter:

I have a tilt adapter which can capture diorama style photo.
I don't know much about this diorama effect but I'm just showing what it will do with this adapter.

Nikon 24mm f/2.8 with tilt Nikon-Nex adapter
This is Nikon 24mm f/2.8 lens with tilt Nikon to Sony e mount adapter.


snowing town, Daegu

at Sincheon-dunchi, Daegu


P.S. If you'd like to read in Korean, you can read it from here--this is my Korean blog.

Monday, June 4, 2018

Olympus Zuiko Auto-T 200mm f/4 lens sample photos.

Olympus OM-System Zuiko Auto-T 200mm f/4 lens technical details:

format: 35mm SLR
type: Prime lens
manufactured: late 1970s ~ 1980s

mount type: Olympus OM
optical design: 5 elements in 4 group
aperture range: f/4~f/32
aperture blade: 8
minimum focus: 2.5 m
filter thread size: 55mm
weight: 515g
length: 127mm
lens coating: Multi coating
Built-in lens hood


I don't much care about this technical details of lens. But sometimes it can be useful.
For example, if I already have 55mm uv filter or hood, I can use with this lens. And I'm walking long hours when I do photo-walks. So if lens wasn't heavy, it was very suitable for me.
So I do check those things from that technical details.

You can read more about the lens from here:


Photos of the lens that I used.
Olympus Zuiko Auto-T 200mm f/4

Olympus Zuiko Auto-T 200mm f/4


Technical notes:

These photos were all taken with handheld and I used Olympus OM lens to Sony E mount or Micro four thirds adapter so I have no idea about aperture number for the photo.

When I am taking photos, I do use Raw file format. So I need to convert Raw file to jpg file and during that time, I do some post-processing--this is kind of darkroom process in developing film.
And when I do this, I don't use any default setting from Rawtherapee because there has some image modification settings like sharpening, micro-contrast and among other things.
I don't use Adobe Photoshop but this also has same kind of default setting.
This isn't important for photography. But this is about the lens--what kind of photo I can take with this lens. So sharpening won't help to know about the lens.

So when I do use Rawtherapee, I removed all the default setting and set to these - contrast: 18, saturation: 3, lightness: 2 in exposure group.
I will do this, if necessary:
 - increase exposure value, if overall image was dark.
 - if there have some areas were too dark or too bright which makes me feel unbalance the overall look, adjust the shadow/highlight value.
 - Sometimes, white balance set to auto. Because Sony A7's white balance value was quite terrible when I do use other brand lens--not Sony E mount lens.


My photos aren't that great so you can check out other people's sample photos:


Sample photos:
I didn't record aperture value so I can't be sure.
But it probably between f/4 to f/5.6. Because judging by the time--late afternoon and I tried to make stand out only birds--I mean other parts to make bokeh so it should be wide open-ish aperture.


Olympus E-P3 with Olympus 200mm f/4:
Below two photos were captured at ISO 500. So those noises were made by Olympus E-P3.

Mallard - Olympus E-P3 with Olympus 200mm f/4
I thought those wave's colors were bit weird but I choose to include it here. Because those thick-ish color expresses about the Olympus(camera and lens)'s style.

Grey heron - Olympus E-P3 with Olympus 200mm f/4

If compare the photos below and above, Olympus E-P3 photos' birds are more bigger.
Olympus E-P3's crop factor is x2 so Olympus 200mm became 400mm which can help to make more close to the subject.
This is one of reason that crop body can be suitable for wildlife photography.


Sony A7 with Olympus 200mm f/4:

Eurasian skylark - Sony A7 with Olympus 200mm f/4
Crop the image from above--Eurasian skylark.
Eurasian skylark - Sony A7 with Olympus 200mm f/4

Below two photos were captured at ISO 2500. So those noises were made by Sony A7.

Wild duck - Sony A7 with Olympus 200mm f/4

Winter leaves - Sony A7 with Olympus 200mm f/4

Grey heron - Sony A7 with Olympus 200mm f/4


P.S. If you'd like to read in Korean, you can read it from here--this is my Korean blog.